
In this article we will discuss the five most common 3D printing errors, what causes them and how to address them. The largest impediment to learning about 3D printing is how many errors you can encounter when you are first getting started. Ask any one who regularly uses a 3D printer and they will tell you that they have experienced each and every one of these failures. But have no fear! It is nothing to be ashamed of, and while frustrating, we will work together to get your problems resolved. The five we will address in this article will be: not sticking to build plate, layer shifting, stringing, warping and spaghettification.
Not Sticking to build plate
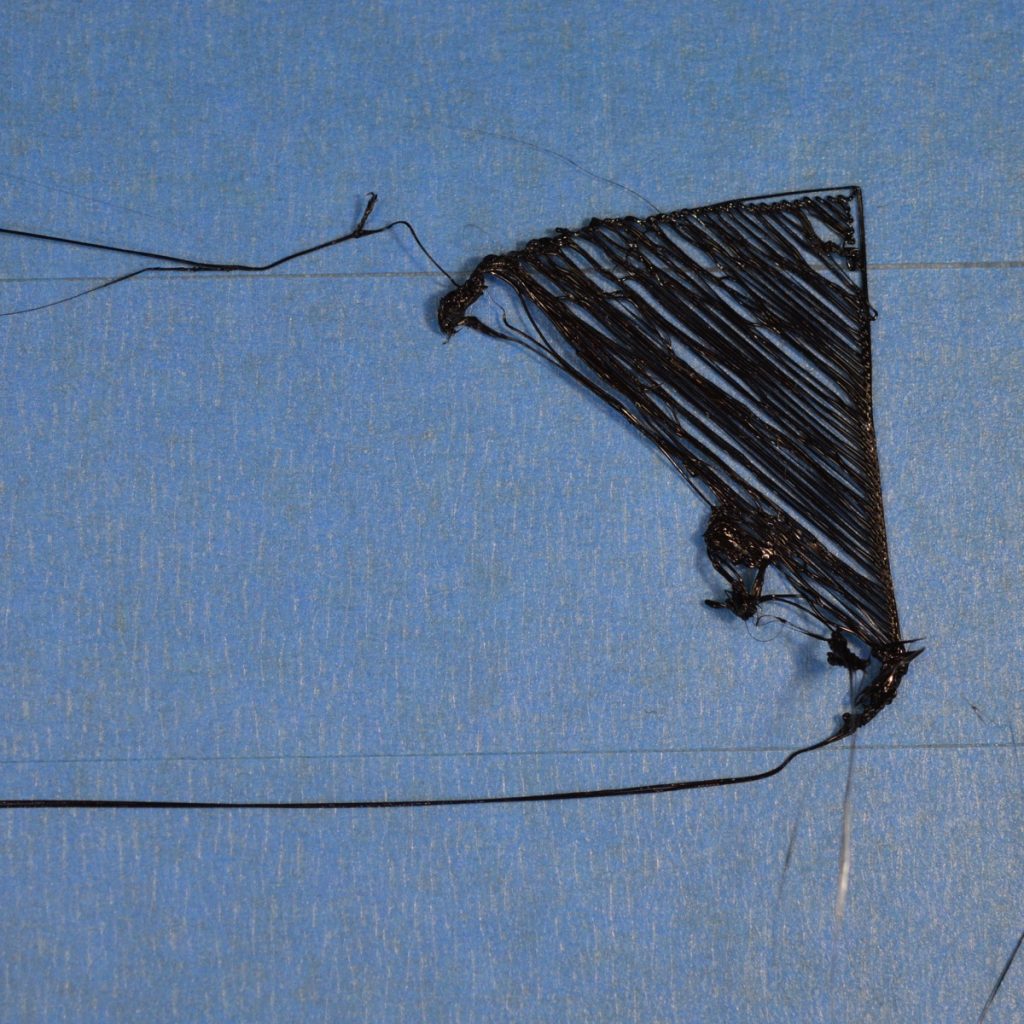
The first issue you may (probably will) encounter when first getting started is the print not sticking to the build surface. The first layer printing successfully is a crucial first step for a print. It is so important that even with my most trusted printers, I always check the first layer of every print. At that point you can usually tell if the print is even worth continuing. Here are some potential causes and solutions:
Uneven Base
When first starting up your printer you will need to do a bed calibration. Some printers are easier than others on this step. For example the Bambu Lab X1 Carbon uses LiDar to produce a perfect first layer. Others like the Prusa MK3.5 uses a sensor to get in the right range, but will take some user input to achieve that nice flat surface. Lastly, printers like an Ender 3 will require the operator to use spring loaded screws underneath to create the level surface. If this is not done well, your printer can end up having high spots and low spots, which will result in material not sticking
Lacking Adhesive
Some times it is actually a bad thing to have too clean of a surface. It can be advantageous to have a rough surface or glue to get the print to stick. This will largely depend on the material and printer that you are using but here are some suggestions that have worked for me: 3D print glue, a regular glue stick, and blue tape
Under Heated Surface
With some material it is require to heat the build plate to get it to stick. with something like PLA that may not be necessary, but for ABS it is. I would recommend checking the material’s manual to see both the print temperature and bed temperature and adjusting your printer to those specifications.
Print Too Thin At Base
If your first layer of your print is too thin, it can struggle to stick. Think of it like friction: the more contact of the surface the better. I would suggest changing your print’s orientation or adding a brim to provide a large surface to stick
Layer Shifting
Layer shift can be incredibly frustrating because it can happen out of no where and ruin a perfectly good print. Even worse, it can be very difficult to identify the cause. You come to collect your print and realize its failed. There doesn’t appear to be an issue, so you decide to just try it again. As the old saying goes, insanity is trying the same thing over and over expecting different results, and 3D printing is the same way. Find some causes and solutions below:
Slicer Error
It may seem ridiculous but you’d be surprised how often a slicer blunder is the cause of this mistake. Things happen, we all know technology does not function perfectly every time, so go back into your slicer, maybe slightly arrange the print’s location on the bed and go again.
Print Head Obstructed
The other major cause of layer shift is when the print head itself may have a collision. Whether its a wrench left in the wrong place, a camera placed too close or a pet thats a bit too curious, a small collision can have a frustrating knock on impact. Check the path your printer head moves on remove any potential threats

Stringing
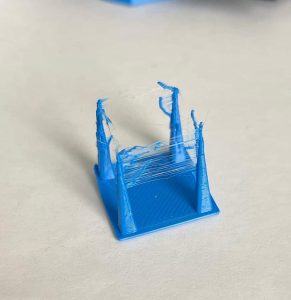
While not as frustrating as a completely failed print, stringing can really mess up how aesthetically your print comes out. Maybe a couple minutes of clean up can resolve the issue, but who has the time to routinely do this when you could just dive into what’s causing the issue. Here are some potential causes and solutions:
Print Temperature Too High
An easy fix might just be that you are printing your material at a temperature thats too high, causing it to over melt and leave behind stringing. Think of it like a grilled cheese or mozzarella stick; if you eat it as soon as it comes off the stove you’ll likely get long strings of cheese, but give it a couple of minutes to cool and the cheese will smoothly break. It can be as easy as just adjusting the temperature on your printer, you don’t even have to go back to the slicer
Retraction Rate
Retraction is built into the code as a method to counteract stringing. Before I explain how it works, I must first explain a little bit of the science of extrusion: When the material is melted, it creates a pressure that forces the material out of the nozzle. The best way manufacturers have found to over come that pressure is to quickly pull back the material a bit in between print spots to reduce the pressure and hopefully stop stringing. The problem is each material reacts differently to this, and can even be drastic in the same material type from one manufacturer to the next. So you may need to go into your slicer and toy around with the retraction rate. Try both increasing and decreasing to see which direction you need to go, then from there you can fine tune
Warping
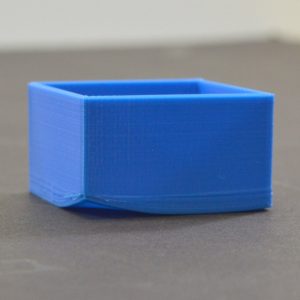
Coming to check on a print and seeing it was a total disaster is frustrating enough, but what about when you think you’ve had a successful print only to realize one of the corners has warped up leaving it useless to you. Warping occurs when an edge or more likely a corner lifts off of the build plate. As it curls up, the printing continues but causes compaction. The rest of the print can often continue without error, but that one spot will be damaged. Below are some potential causes and how to prevent them in the future.
Bed Temperature
Depending on the material, the bed temperature can become extremely important. For ABS as an example, if the build plate gets too cool the material will lift up. It is important to read the manual for each company’s material to make sure you have the right bed temperature set. Additionally, it is worth your time to occasionally test to make sure your bed is heating evenly.
Ambient Temperature
This is the issue I’ve had more than anything else with my printers. Ambient air and the occasional cool breezes can result in a corner lifting up. Prints undoubtably are more successful in a breezeless, warm temperature condition. For that reason, an enclosure for your printer can be extremely beneficial. They can be rather expensive though, so I would recommend either building a cheap version or at least using some card board around your printer as walls to protect against air conditioning.
Lack of Brim
The longer and thinner a print, the more likely it is you will see warping on one side. To prevent this, I would recommend adding a brim to make the entire print wider. Think of a brim as a suction cup, and the bigger the better.
Spaghettification

One of the major improvements in the 3D printer space in recent years is sensors being able to identify when a major failure has occurred, resulting in what many refer to as spaghettification. When the print does not stick and the material flows out unrestricted, you end up with a giant ball of loose material that looks like a plate of spaghetti. The octoprint set up, as well as newer printers such as the bambu lab x1 carbon can see this happening and stop the print to reduce material waste and potential damage to your printer. Below we will take a look at some reasons this may happen and how to resolve them.
Print Never Stuck To Print Surface
If you lose focus and let a print run without the first layer sticking to the bed, you may end up with a ball of strung material. One way to check this is to see if you have any solid printed pieces at all; if you are printing a person, maybe you’ll be able to see the feet in the loose ball. If you do not see any trace of early success on the print, there is a good chance it just never stuck. if that is the case, please review the not sticking to build plate section above.
Not Using Enough Support
A simple but potentially over looked cause of the ball of loose material could be that your print needs more support material. If you’re new to printing, support material is necessary when you go to print in a spot that does not have existing material. If there is no material below, the extruded material will have nothing to attach to and will come out like loose pasta.
Conclusion
While 3D printing can be very rewarding, it can be a difficult hobby to get into. With a variety of issues that may occur, it can be helpful to review the most likely problems and do your best to avoid them. Accidents always happen, but try to keep a positive attitude and address the issues one at a time.
By Kyle Sylvester